


Last updated March 2021
It’s a while since I built any scratch-built wagons, but as part of my purge to finish things that I have started, I found eight part-finished wagon bodies that I made probably 25 years ago. They were based on drawings in the OPC book of Southern Wagons, Vol 2 (LB&SCR) - and that was published in 1985.
 The wagon bodies consisted of four round-
ended type A opens, with just the ends, sides and floor made, and a further four type D2 opens with a little detail added - corner plates and strapping (‘plate washers’ in real terminology I think). I had also part completed the underframes on these four D2’s (sole bars and W-irons).
I was quite surprised, given the age of the wagons, that they were still square, and in one piece - as good as new in fact, so I decided to take a break from making locos, and finish them.
 Making the basic wagon bodies was fairly straightforward. All you need is a good drawing, some 20thou plasticard, a scribe, and a straight-
edge. Work out the width of the planking, scribe the plasticard, cut to size and glue together. So far so good. (It probably took no more than an evening to make these eight wagon bodies, although I can’t remember now).
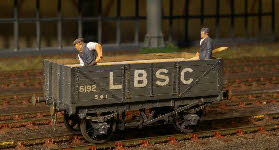
 Adding the bits of metalwork to the wagon body is not particularly difficult. I use 5 thou plasticard (which scales up to about 1/3 inch -
 about right). The corner plates were scored on the inside of the corner to make them easier to bend cleanly (not too deep or the plasticard will split when bent). The other bits are mostly straight and easier to make, except for the hockey-stick shaped bits on the wagon with the external diagonal strapping (photo left).
The wagon ends are a bit more tricky. The wagons with timber under-frames are straightforward enough - a couple of lengths of 60thou by 60thou Evergreen section filed to a slight taper does for the end uprights.
 The steel underframe wagons are a bit more difficult, with steel T-
section uprights. These are made out of two pieces of plasticard - a piece of 5 thou strip glued flat, and a piece of 10thou strip glued edge-on for the ‘stalk’ of the ‘T’. Ten thou is probably rather over-scale, but 5 thou is just not robust enough for this.
The arc shaped plates around the top of the ends require a bit more care - I made two plasticard templates, one for the inner diameter, and another for the outer diameter so that I could cut out the pieces accurately.
 The task which stopped me finishing these wagons years ago was adding the bolt heads. My original technique was to cut out tiny squares of plasticard, and glue them one by one on the wagon -
 a very tedious process. I came across an article about girder bridges which referred to the use of epoxy glue, and the end of a piece of wire to apply small dots. I’ve since come across Barry Norman’s article in MRJ which used the same technique but with PVA instead of epoxy.
 The wagon bodies consisted of four round-
I was quite surprised, given the age of the wagons, that they were still square, and in one piece -
 Making the basic wagon bodies was fairly straightforward. All you need is a good drawing, some 20thou plasticard, a scribe, and a straight-
 Adding the bits of metalwork to the wagon body is not particularly difficult. I use 5 thou plasticard (which scales up to about 1/3 inch -
The wagon ends are a bit more tricky. The wagons with timber under-
 The steel underframe wagons are a bit more difficult, with steel T-
The arc shaped plates around the top of the ends require a bit more care -
 The task which stopped me finishing these wagons years ago was adding the bolt heads. My original technique was to cut out tiny squares of plasticard, and glue them one by one on the wagon -
Both seem to work, but I found it very hard to control the size of the dot, so I have reverted to my original technique. It takes me about two hours to do one side of a wagon, but spaced out over a couple of weeks I’ve now finished applying the bolt/rivet heads to the last four wagons.